Thursday, January 30, 2014

Painted Cakes

I'm back with some more of last year's cakes. This time I thought I'd show you some painted cakes. I took The Hand Painted Cake course on Craftsy a while ago. This is one of their free classes, so feel free to go check it out. One thing I do differently than the video though is that I use food grade airbrush colors rather than regular food colors. They don't need to be watered down with lemon extract as much and they blend much nicer.

This is one of the first ones I did. This cake was purely an "accident".  Well, it was inspired by one anyway. Mike and I were driving home from delivering a cake on a rainy afternoon when a young buck couldn't decide which way he wanted to go across the street. Unfortunately, he chose the wrong way. Fortunately, he wasn't hurt and neither was our vehicle, but as we stopped to check for damage, I noticed the beautiful lilies in the pond next to us. I was thankful that my camera was in the van and snapped a couple of photos. My husband kids that only I could turn a deer collision into a photo-op. :o)


I looked up tutorials for making water lilies, but didn't like the results of them, so I just played around. I cut a pattern from cardstock with my Silhouette and used it for the petals and cut them out with an x-acto blade.  Then I just played around with shaping the petals and used tissue between them to space them out till the gumpaste hardened.

The scene on this next one was inspired from a painting book I have: From Flea Market to Fabulous by Kerry Trout.


As you can see, it was for a gentlemen celebrating his 95th birthday. I tried to make the tractor look a bit vintage, more like the ones he would have used in his early day. Even though church and the subsequent party for this young man were canceled due to the extreme cold that day, we took this on over to him with a couple other brave souls to celebrate. It's not every day you get to celebrate your 95th birthday!


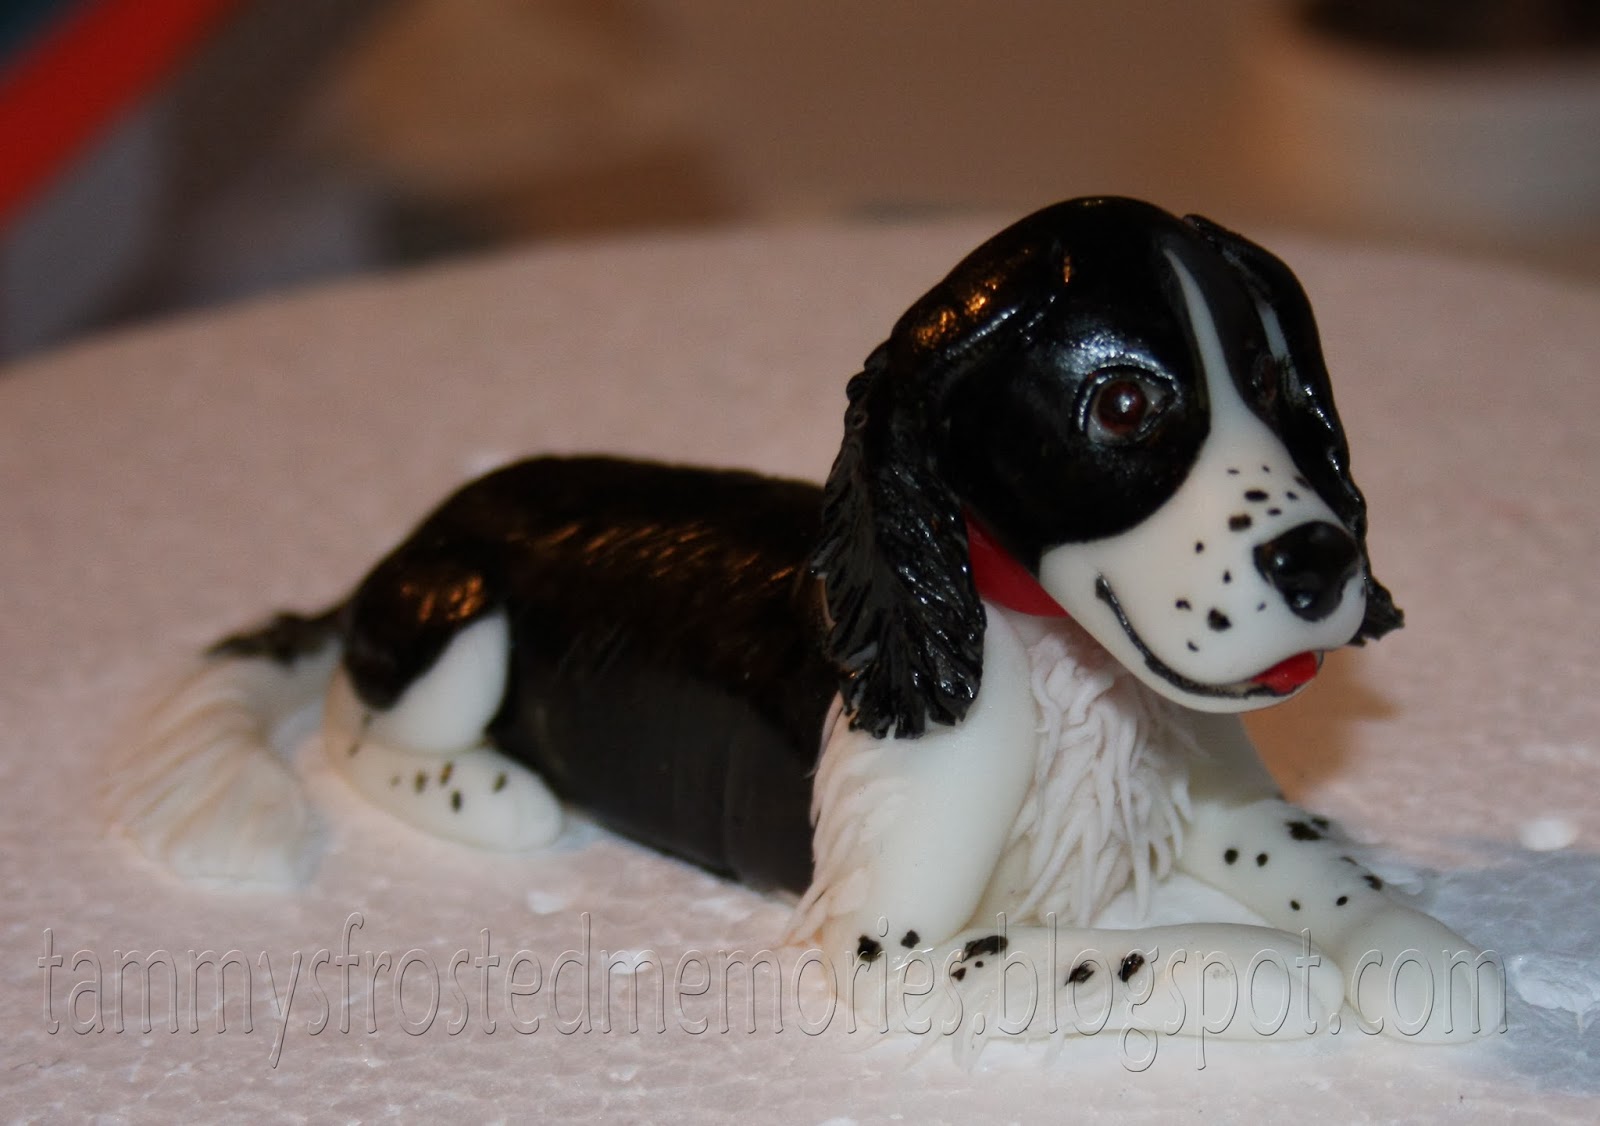
I will leave you with a sneak peak of the cake I'm currently working on. This is Peggy. Isn't she cute?! I used another tutorial from McGreevy Cakes. This lady has some awesome cake skills!


Well, it's time for lunch and another Wii Party match with my daughter. Gotta go!

Till next time...
God's love and blessings!

Thursday, January 23, 2014

A Year in Review--Not happenin' :o)

I must have had a short term memory block when I wrote that I might do a Year in Review post. I didn't realize how many cakes I got to make this last year. And each one was so fun to do that I would have a hard time narrowing it down to a reasonable number of cakes to squeeze into one post. It would be much easier on my sanity to do it a little bit at a time.

With that in mind, I'll think I'll post updates by theme, starting with baby showers.This first one is actually a dummy cake that went on top of two other layers. Unfortunately I didn't get a good picture of the finished cake. The topper was modeled using Carlos Lischetti's book, Animation In Sugar. Awesome book! Totally worth the investment.
This next one I got to use my baby mold for the first time. I used Shawna's awesome tutorial for this little girl. So sweet! I love me some baby bum. :o)
Here she is on her pretty cake. I invented my own tutu flowers to go with the Tutu Cute theme of the shower.
This one wasn't technically for a baby shower. It was a gift during a holiday visit to show little Abby that she will always be top dog. Abby will have to wait 'till April to meet her little sibling. I was able to use my baby mold again, but Abby was modeled by hand from a picture I was given.
Here's a close-up of Abby. Trying to match a breed is difficult.
 Well, my little one is busy practicing her piano and I must go give encouragement and help her to study for a test.

Till next time...
God's love and blessings!

Monday, January 13, 2014

Well, hello there, 2014!

Wow, just wow. I can't believe how long it's been since I've posted to this blog. Anyone checking this might think I fell off the face of the earth. The truth is I opened a Facebook page just for my cakes, and kind of forgot about this little page. It's so much faster to post a picture there and write a short sentence or two rather than come up with a blog post, plus I get likes and comments and such so I know someone is actually reading them. (Hint, hint. You're welcome to leave a comment here too. ;o)

Anyway, I'm not even sure where to begin here. I've done so many cakes this last year and learned so many great techniques. Maybe I'll see if I can put together a "Year in Review" post to highlight my top 10 cakes for 2013.

Meanwhile, I'll leave you with the cake that I gave a sneak peak of way back in April.


Till next time...(which I hope will be this month or at least in this year! :o)
God's love and blessings,
Tammy


Tuesday, April 16, 2013

Spring flowers

I don't know about where you live, but up here, spring has not sprung yet. :o( At the beginning of April I was just starting to see my flower bed...

...and then this happened.

Those are snowballs falling from the sky.

Now, don't get me wrong, I love the snow, I honestly do. That's a good percentage of why we moved up here, but, I'm beginning to miss the flowers. I wonder if my tulips are enjoying their extra long nap this year.

Anyway, we have a Ladies' Salad Supper coming up this weekend, and I decided we needed some spring flowers. Since I don't have any in the yard, I made some. :o) Mind you, my flowers will never compare to the ones the Lord makes for us to enjoy, but they will help to brighten an otherwise gray and colorless spring.

 They're not finished quite yet, but here's a sneak peak for anyone else who is missing the bright colors of spring.


Till next time...
God's love and blessings!

Saturday, March 9, 2013

New Techniques

I discovered Craftsy a little while ago and have taken several of their cake decorating classes. All of them have been wonderful, but I think the one I just finished is one of my favorites. It helped answer a lot of my fondant bulging questions.

If you are interested at all in cake decorating, and especially covering your cakes with fondant, check out the Clean & Simple Cake Design class. It is great! I made this cake using the techniques from this class, and guess what? There's no ganache under that fondant! It's all buttercream.


Oh yeah! No buckling, no sagging. I am one happy decorator today. :o)

Jessica's class is all about clean and simple lines and she shows you how to get this awesome vertical stripe on your cake with minimal effort. I like her wax paper transfer technique, but by far, learning the secrets of straight sides was the best thing I took from this class.

I learned that my issues were not with my home made marshmallow fondant, (that's what she uses and teaches you how to make), but in the techniques. Yes, you DO need to refrigerate a buttercream cake, and yes it DOES need to be in the fridge until a couple hours before serving. I kept this in the fridge until Sunday morning and took it to church. It sat at room temp for almost 4 hours before our Fellowship Supper. No bulges, no sagging, and no condensation issues. It was yummy too. ;o)

Jessica also teaches how to make modeling chocolate since that is what she uses for those awesome stripes. I've used it a lot in the past, but never really realized how nice it is, for stripes especially. It doesn't stretch when you're cutting it out and it doesn't dry out super fast like fondant and gumpaste, so you have time to work with it.

I decided to try my hand at daffodils and since they were going on cupcakes, I wanted them completely edible and yummy, so I used the modeling chocolate from the cake. I have a very old Wilton gumpaste flower set that happened to have daffodil cutters in it. It worked great. Normally, daffodils would have stamens in the middle, but I have no idea how to make edible stamens and didn't want to go ripping them out of everyone's cupcakes before they ate them, so these flowers are stamen-less.I'm sure no one even realized that but me.

Oh, almost forgot to mention, if you click on the class name above, it will take you to a promotion page where Jessica's class is 50% off! Wish I'd had that when I signed up, but it was still worth every penny I paid. Besides all the great info in the videos, I was able to post questions, and Jessica was super quick at answering them for me.

Well, I'm off to get some more projects done.

Till next time...
God's love and blessings!


Saturday, February 23, 2013

Owl Cake

I think I'm overloading my friends with all the posts I've put up this week on the blogs, but, I figured if I've got the free time, I might as well catch up on some of the cakes I've done in the past. I actually can't believe I didn't blog about this one sooner. It's one of my favorites.


I can't really take much credit for it though. I used the invites to design the cake and the owl is an exact replica of the one on the super cute invite. I believe the invitations came from etsy, but I'm not sure which shop.

Little Maya was turning one and they wanted a little cupcake just for her so I made a smaller version of the owl for her cupcake, and all the others got matching bows.


This cake was super fun and I think it came out super cute too. Happy Birthday, Maya!!


Till next time...
God's love and blessings!

Thursday, February 21, 2013

Horse Lovers Cake

I did this cake for a couple of young ladies at our church. As you can tell, they both love horses, so this was an easy one to design.


The horse silhouettes were done by printing horse outlines onto printer paper, placing that under some parchment paper and then filling in the lines with melted chocolate. ALWAYS make extra. There's bound to be some broken legs and tails. The top horse is actually the second one I made since the first one broke in transit.

The cake itself was simply covered and decorated with buttercream. The flowers were royal frosting and the horse shoes were made from chocolate clay and brushed with silver pearl dust.

This was actually a pretty easy cake to do and I was quite happy with the results.

Well, what do you think? What other designs would work with this silhouette idea?

Till next time...
God's love and blessings.