Tuesday, May 5, 2015

Spring flowers

Hello there! I am back for a quick minute. I'm so sorry it's been so long. Lots of life going on here. The kitchen remodel is 99% finished. There's still some trim work to do and I need to find some fabric for window coverings, but otherwise, it's up and fully operational. I am LOVING it!! Unfortunately, I've been so busy I haven't taken the time to get some decent photos of it. I will do my best to get that done soon, but May is super jam-packed with oodles and oodles of things going on, to include a trip to see family and quite a few graduation cakes to make. Could someone please add an extra day to my weeks? I could really use it.

Anyway, I didn't have many cakes to make in March and April, but I did make this one for a church get-together a couple of weeks ago.


I designed it to match the programs we made for the event. I printed the verse on wafer paper and cut it out. I then used a paper towel as an "ink" pad. I simply folded it up and put a couple drops of airbrush color on it. I then used a clean stamp set and stamped the flowers onto wafer paper and used the coordinating punches to punch them out. I've linked below to the stamps and punches I used. I found that I could shape the large petal by running a bone folder over it just as I would a paper flower. The smaller flowers were shaped by brushing a small amount of water at the base of each petal. As the wafer paper dried, it curled up a bit, giving the flowers some dimension. I then piped royal frosting dots all around and in the center of each flower. Once that dried, I brushed each one with gold airbrush paint. Oh, and the gold color at the top and bottom was sprayed on using Wilton gold spray. I don't have an airbrush...yet. :o)

I need to close this here. Hope you are having a wonderful week and get a chance to enjoy something sweet. ;o)

Till next time...
God's love and blessings!

Built for Free Using: My Stampin Blog

Tuesday, March 10, 2015

It's Really Quiet Over Here.

Hello there! The title is a bit misleading. It's a little quiet here on the blog, but that's because it's anything but quiet in my kitchen.


We've taken on a bit of a kitchen remodeling project, so my cakes have been on hold for a bit. I promise to be back with more cakes, and some "before" and "after" shots of the kitchen. We're about 80% done now. Just waiting for the new counter to come in and to do some trim work. 

I will say that I am over-the-moon happy with the results so far. I no longer feel like I'm imprisoned in the tower all alone. I can't really call it the dungeon since it's on the second floor of our house (don't ask, I have no idea what the designer was thinking when they built this house), but I did feel very closed off from everyone else. 

Anyway, I will be back, hopefully, later this week. 

Till next time...
God's love and blessings! 

Tuesday, January 27, 2015

Forest for the Trees

Hello again. I wanted to share 2 wedding cakes I've made recently with a tree theme to them, but then I remembered another tree themed cake...and then another. I didn't realize how many cakes I've made with some kind of tree on them.

Here's the two wedding cakes.


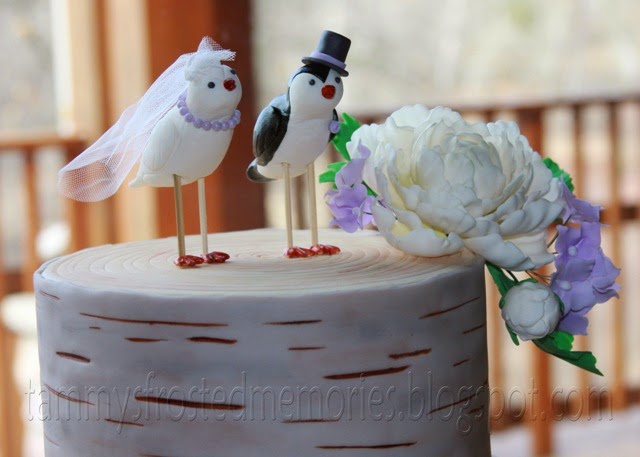
As you can see, they both had an aspen theme to them. I made the toppers for both cakes. The birds were gumpaste. The legs and veil were not edible though. 

I had help from the bride's sister in making the bottom cake. We had to experiment to figure out a way to make pine cones. It ended up being a lot easier than I thought they would be. Next time I have to make pine cones, I will take pictures so I can show you how I did it. The hat and veil weren't edible on this one either. While I like both of these, I think I can get better at the aspen bark texture. 

Here's a couple of birthday cakes with trees in them:


This next one I made for my handsome hubby. He loved Guardians of the Galaxy so I had to make him a little Groot.

This one doesn't necessarily have a tree on it, but I had a lot of fun learning how to make a nice "wood plank" base for the cake to sit on.

I used this tutorial by Elisa Strous to make it. I think it came out pretty nice, and to be honest, it was really fun to do.

This is still one of my favorite cakes of all time. LOVE!

This next cake was for a fall get-together at our church, and I taught a class on it. That was a lot of fun, but next time, we're making the owl from modeling chocolate. We made them from fondant, but our little owls kept getting shorter and fatter as the class went on since fondant takes such a long time to harden. It was quite funny as we kept squishing their little bodies to lift them back up again. ;o) 
And finally, here's a cute baby shower cake for one of my hubby's co-worker's daughter. The animals were based off the invitation for the party that I believe were designed by the teenage nephew of the mom-to-be. Very talented young man there. Aren't they adorable? 

Looks like I've shared a forest full of trees, or maybe it was a jungle. :o) 

Till next time...
God's love and blessings!

Saturday, January 10, 2015

Alice in Wonderland

Hello there! I'm enjoying a nice chilly day here in the north, all snuggled up inside and sipping some hot cocoa. I've been working on my computer and trying to organize and back up photos and realize I have a LOT of them I haven't shared on here. I must remedy that. I think I will start with these photos of my nephew's wedding back in May, mostly because the finished pictures were taken outside with lots of warm sunshine. ;o)

My nephew and his lovely bride were having a themed wedding, and in case you didn't figure it out from the title of this post, it was an Alice in Wonderland theme. My head was about to explode with all the different ideas going on in there. So many fun things in that story to re-enact on a cake; the Mad Hatter, rabbits, playing cards, flowers, tea cups and pots, roses, etc. Did I mention they wanted 200 cupcakes to go with the main cake? That's a lot of modeling chocolate fun right there!

I actually took several in-progress shots for this cake because I worked on it over quite a long time. My nephew doesn't live near me, in fact he lives several states away so I knew I was going to have to ship something there as I wouldn't be able to transport it all on the plane and it needed extra time to get there. I couldn't ship my tools since I would need them, so that meant shipping the cupcake toppers. I've seen other decorators that sell their cupcake toppers online and ship them. I've shipped an Elsa and Olaf topper and didn't have too much trouble, I thought these wouldn't be too bad. I thought wrong. ;o( More on that later.

Here's the beginning of my tea pot.
Not too bad, but I wish I'd spent more time with the royal frosting undercoat to smooth out the rice crispy bumps better.
Here's the gumpaste tea cup to go with the tea pot. 

Here's some of the little details I was able to make ahead. Loved the door knob. 
Bunny butt! Sorry, that's just too fun to say. ;o) Did you notice my "butter"fly?
Here are some of the cupcake toppers before I mailed them off. Everything is made from modeling chocolate.
Here's some more. Unfortunately, they didn't look like this when they arrived. They looked more like a pile of green and white confetti. The watches and keys arrived fine, but I spent a frantic day recreating hats and roses.
 Here's the items I took as a carry-on on the plane. They arrived just fine. :o)
 Here are the toppers on their cupcakes. Drink Me bottles...
 hats...
 keys...
 flowers with faces...
 pocket watches...
 and roses. The idea in my head didn't look this gruesome though. Does anyone else see blood instead of paint? Yuck!
And here's the main cake all put together.
 Unfortunately I didn't get any super great shots of the cake before it was set up outside. While outside lighting can make for some great photos, the dinner buffet in the background didn't make such a great backdrop for it.
 Here's a few close-ups. This cake really had a LOT of stuff going on. You couldn't get it all in one photo. Here's the teacup, butterfly, Cheshire cat, part of the door knob, some of the singing flowers, and you can just see the "drink me" bottle behind the teacup.
Here's some more of the flowers, a playing card with his can of paint, and oh look, a bunny butt! Sorry. I couldn't help myself. Tee-hee. Now the roses on here don't look quite as gruesome as the ones of the cupcakes did. 
 And, the precarious teapot with still more flowers and the pocket watch.
All-in-all this was a really fun cake to make. A lot of time and work, a lot of things I would do differently next time, but a lot of fun too, and I'm so glad I was able to do this as a gift to my nephew and his new bride.

It looks like my mug is empty. Time to go get a refill. I will try and get on here next week and share another cake or two with you.

Till next time...
God's love and blessings!

Saturday, January 3, 2015

My Son's Wedding cake

Hello there and Happy New Year! I enjoy looking back over the year to see all the fun cakes I was able to make. I will try and share my favorites with you over the next couple of weeks. 

We had 3 family weddings last year that I got to make the cakes for. I have found that there are 2 extra benefits to making cakes for family get-togethers: there are volunteers to help with the cake, and extra (clean) hands to take photos of the process. So, I have more than just the finished shot to share with you today. 

Here I am putting ganache on the top tier. (I look so serious.)
My gorgeous sister helping to cut out flowers...LOTS of flowers.
Attaching the wafer paper butterflies.
This was a little surprise on the back of the cake for my son from his bride. How do yo hide a Tardis?
The topper was the bride's grandmother's. We removed the silk leaves and trailed the vine and butterflies across it.
This is the only good shot I got of it completely finished. I had forgotten the pearls in the photo above.
I don't usually get to see the bride and groom's reactions to the cake. This is when he saw the Tardis on the back.
Aren't they a cute couple?
And, cutting the cake. They work well together. ;o)

Hopefully, you will be seeing more posts on here in the future. Part of my preparation for the new year was to re-organize my planner and I put a section in with what will, hopefully, be a better system for me to sit down and write some posts out. Rather than just listing different things I'd like to share, I printed a calendar and put those ideas on specific dates. I hope it works. :o) 

So, till next time...
God's love and blessings!

Friday, December 26, 2014

Poinsettia Candle Cake

Wow, I can't believe Christmas is over for 2014 already. I purposely didn't make many cakes this month because I wanted to be able to focus more on my family and other projects. I did, however make a cake for our church get-together at the beginning of the month, and finally have time to sit down and share it with you.
What do you think? I was so excited when the idea in my head, came out in sugar. It doesn't always happen that way.

I used this tutorial by Shawna McGreevy to make the candles. They are essentially rice crispy treats covered in modeling chocolate with a birthday candle inserted in the middle. I don't have cutters for the poinsettia flower though, so I looked at lots of pictures, drew out 7 different size "leaves" and hand cut 4 of each in red and 5 more of the largest one in green. Hopefully the next time I get to make this flower I will have time to photograph, or even video tape the process so I can share a little tutorial with you.


It's hard to see in the pictures, but there's a sparkly, tone-on-tone flourish around the cake. I made a paint with petal dust and lemon extract and then stippled that on the side of the cake using a stencil. The snowflakes were cut using PME cutters. I wish I'd had more time to do this as I would have made the snowflakes a bit sparkly too.

Here's a picture of it at church with the candles lit. So fun!!!


I guess that's it for now. I have a bit of a relaxed schedule this next two weeks, so hopefully I'll be able to post a few more of my cakes from this last year.

Till next time...
God's love and blessings!

Tuesday, September 2, 2014

Wafer Paper Mini Book Tutorial

Hello there! Welcome to my sweet little corner of the web again. Today I am going to share with you a fun tutorial for making mini books. These are great for cupcake toppers, and I thought they were rather appropriate with everyone in this house heading back to school this week.

I recently made this storybook cake for a baby shower:
Along with some matching cupcakes.

Since this was the second time I've made these books, and I had a lot of questions about how I made them the first time, I took pictures as I worked so I could write up a tutorial. Hope it makes sense. :o)

The first couple of steps I don't have pictures for, sorry. I went to the library and checked out books that I wanted to use. Then I scanned each side of them, including the spine, into my computer and used PhotoShop to put the pieces together. Then I laid them out in a document to fit as many as I could on a sheet of wafer paper at about the size I wanted them to be. I actually could have made them a bit smaller and they would have looked fine. The next step was to use my edible printer to print the book covers onto wafer paper.
Once they are dry to the touch, you need to cut them out. I used a paper cutter, but you could easily use scissors for this as well. Then I measured the size I wanted for the pages and cut them with the paper cutter as well. Now, my inside pages were blank. You could print these as well, but that was WAY more work than I was willing to do. I liked that I could stack a couple of sheets and cut them at the same time. This was also a good way to use some of my wafer paper that got kind of crushed in transit to my house. (You can see the torn corner on this one.)
The next step is to glue the pages together. I used a paint brush to apply piping gel just to the "spine" edge of the paper and then stacked another one on top. I think I did 6-8 pages/book. Depending on the spine, you could do more, but these were children's books, so they're not very thick.
Now, back to the covers. You need to roll out some fondant. I think I went to 3 or 4 on my KitchenAid pasta roller. (LOVE my pasta roller!) You could go thinner if you'd like. Once rolled out, I used piping gel all over the backside of the book covers and "glued" them to the fondant. Then I used an exact-o knife to cut around the edges.
It helps to fold the book in half for this next step just to help you see where the spine is. Fold it, and then lay it out, with the inside face up. Run a line of piping gel right along the spine.
And then "glue" your pages inside. The fun part about this is that the book can be somewhat opened to see the individual pages inside.
Because the covers are made with fondant, they edges tend to get a little ragged with handling.
Simply tap the edges on your table top, and that will push in any fondant that may have squished beyond the wafer paper edge and kind of even things out a bit. You'll want to do this on all three of the cut edges.
 Ta-da! Nice and smooth.
And there you have it. Lots of cute mini books to decorate with. These can be made several days ahead to make things easier on baking/decorating day.
If you don't have an edible printer, I've heard there are places where you can send your picture and they will print it for you. I just don't know who they are. You could also simply wrap the wafer paper pages with fondant, let it dry a bit and paint your book cover with food coloring or edible pens. A Bible would be pretty easy to do with this technique as you would really only have to draw a cross on it.

I hope this tutorial will be of help. These really are fun to make, and there's just something about miniature things that are just so fun to play with. :o)

Till next time...
God's love and blessings!