Tuesday, January 27, 2015

Forest for the Trees

Hello again. I wanted to share 2 wedding cakes I've made recently with a tree theme to them, but then I remembered another tree themed cake...and then another. I didn't realize how many cakes I've made with some kind of tree on them.

Here's the two wedding cakes.


As you can see, they both had an aspen theme to them. I made the toppers for both cakes. The birds were gumpaste. The legs and veil were not edible though. 
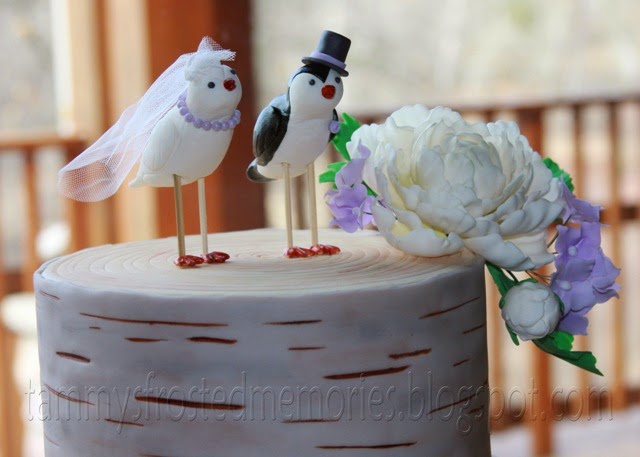
I had help from the bride's sister in making the bottom cake. We had to experiment to figure out a way to make pine cones. It ended up being a lot easier than I thought they would be. Next time I have to make pine cones, I will take pictures so I can show you how I did it. The hat and veil weren't edible on this one either. While I like both of these, I think I can get better at the aspen bark texture. 

Here's a couple of birthday cakes with trees in them:


This next one I made for my handsome hubby. He loved Guardians of the Galaxy so I had to make him a little Groot.

This one doesn't necessarily have a tree on it, but I had a lot of fun learning how to make a nice "wood plank" base for the cake to sit on.

I used this tutorial by Elisa Strous to make it. I think it came out pretty nice, and to be honest, it was really fun to do.

This is still one of my favorite cakes of all time. LOVE!

This next cake was for a fall get-together at our church, and I taught a class on it. That was a lot of fun, but next time, we're making the owl from modeling chocolate. We made them from fondant, but our little owls kept getting shorter and fatter as the class went on since fondant takes such a long time to harden. It was quite funny as we kept squishing their little bodies to lift them back up again. ;o) 
And finally, here's a cute baby shower cake for one of my hubby's co-worker's daughter. The animals were based off the invitation for the party that I believe were designed by the teenage nephew of the mom-to-be. Very talented young man there. Aren't they adorable? 

Looks like I've shared a forest full of trees, or maybe it was a jungle. :o) 

Till next time...
God's love and blessings!

Saturday, January 10, 2015

Alice in Wonderland

Hello there! I'm enjoying a nice chilly day here in the north, all snuggled up inside and sipping some hot cocoa. I've been working on my computer and trying to organize and back up photos and realize I have a LOT of them I haven't shared on here. I must remedy that. I think I will start with these photos of my nephew's wedding back in May, mostly because the finished pictures were taken outside with lots of warm sunshine. ;o)

My nephew and his lovely bride were having a themed wedding, and in case you didn't figure it out from the title of this post, it was an Alice in Wonderland theme. My head was about to explode with all the different ideas going on in there. So many fun things in that story to re-enact on a cake; the Mad Hatter, rabbits, playing cards, flowers, tea cups and pots, roses, etc. Did I mention they wanted 200 cupcakes to go with the main cake? That's a lot of modeling chocolate fun right there!

I actually took several in-progress shots for this cake because I worked on it over quite a long time. My nephew doesn't live near me, in fact he lives several states away so I knew I was going to have to ship something there as I wouldn't be able to transport it all on the plane and it needed extra time to get there. I couldn't ship my tools since I would need them, so that meant shipping the cupcake toppers. I've seen other decorators that sell their cupcake toppers online and ship them. I've shipped an Elsa and Olaf topper and didn't have too much trouble, I thought these wouldn't be too bad. I thought wrong. ;o( More on that later.

Here's the beginning of my tea pot.
Not too bad, but I wish I'd spent more time with the royal frosting undercoat to smooth out the rice crispy bumps better.
Here's the gumpaste tea cup to go with the tea pot. 

Here's some of the little details I was able to make ahead. Loved the door knob. 
Bunny butt! Sorry, that's just too fun to say. ;o) Did you notice my "butter"fly?
Here are some of the cupcake toppers before I mailed them off. Everything is made from modeling chocolate.
Here's some more. Unfortunately, they didn't look like this when they arrived. They looked more like a pile of green and white confetti. The watches and keys arrived fine, but I spent a frantic day recreating hats and roses.
 Here's the items I took as a carry-on on the plane. They arrived just fine. :o)
 Here are the toppers on their cupcakes. Drink Me bottles...
 hats...
 keys...
 flowers with faces...
 pocket watches...
 and roses. The idea in my head didn't look this gruesome though. Does anyone else see blood instead of paint? Yuck!
And here's the main cake all put together.
 Unfortunately I didn't get any super great shots of the cake before it was set up outside. While outside lighting can make for some great photos, the dinner buffet in the background didn't make such a great backdrop for it.
 Here's a few close-ups. This cake really had a LOT of stuff going on. You couldn't get it all in one photo. Here's the teacup, butterfly, Cheshire cat, part of the door knob, some of the singing flowers, and you can just see the "drink me" bottle behind the teacup.
Here's some more of the flowers, a playing card with his can of paint, and oh look, a bunny butt! Sorry. I couldn't help myself. Tee-hee. Now the roses on here don't look quite as gruesome as the ones of the cupcakes did. 
 And, the precarious teapot with still more flowers and the pocket watch.
All-in-all this was a really fun cake to make. A lot of time and work, a lot of things I would do differently next time, but a lot of fun too, and I'm so glad I was able to do this as a gift to my nephew and his new bride.

It looks like my mug is empty. Time to go get a refill. I will try and get on here next week and share another cake or two with you.

Till next time...
God's love and blessings!

Saturday, January 3, 2015

My Son's Wedding cake

Hello there and Happy New Year! I enjoy looking back over the year to see all the fun cakes I was able to make. I will try and share my favorites with you over the next couple of weeks. 

We had 3 family weddings last year that I got to make the cakes for. I have found that there are 2 extra benefits to making cakes for family get-togethers: there are volunteers to help with the cake, and extra (clean) hands to take photos of the process. So, I have more than just the finished shot to share with you today. 

Here I am putting ganache on the top tier. (I look so serious.)
My gorgeous sister helping to cut out flowers...LOTS of flowers.
Attaching the wafer paper butterflies.
This was a little surprise on the back of the cake for my son from his bride. How do yo hide a Tardis?
The topper was the bride's grandmother's. We removed the silk leaves and trailed the vine and butterflies across it.
This is the only good shot I got of it completely finished. I had forgotten the pearls in the photo above.
I don't usually get to see the bride and groom's reactions to the cake. This is when he saw the Tardis on the back.
Aren't they a cute couple?
And, cutting the cake. They work well together. ;o)

Hopefully, you will be seeing more posts on here in the future. Part of my preparation for the new year was to re-organize my planner and I put a section in with what will, hopefully, be a better system for me to sit down and write some posts out. Rather than just listing different things I'd like to share, I printed a calendar and put those ideas on specific dates. I hope it works. :o) 

So, till next time...
God's love and blessings!

Friday, December 26, 2014

Poinsettia Candle Cake

Wow, I can't believe Christmas is over for 2014 already. I purposely didn't make many cakes this month because I wanted to be able to focus more on my family and other projects. I did, however make a cake for our church get-together at the beginning of the month, and finally have time to sit down and share it with you.
What do you think? I was so excited when the idea in my head, came out in sugar. It doesn't always happen that way.

I used this tutorial by Shawna McGreevy to make the candles. They are essentially rice crispy treats covered in modeling chocolate with a birthday candle inserted in the middle. I don't have cutters for the poinsettia flower though, so I looked at lots of pictures, drew out 7 different size "leaves" and hand cut 4 of each in red and 5 more of the largest one in green. Hopefully the next time I get to make this flower I will have time to photograph, or even video tape the process so I can share a little tutorial with you.


It's hard to see in the pictures, but there's a sparkly, tone-on-tone flourish around the cake. I made a paint with petal dust and lemon extract and then stippled that on the side of the cake using a stencil. The snowflakes were cut using PME cutters. I wish I'd had more time to do this as I would have made the snowflakes a bit sparkly too.

Here's a picture of it at church with the candles lit. So fun!!!


I guess that's it for now. I have a bit of a relaxed schedule this next two weeks, so hopefully I'll be able to post a few more of my cakes from this last year.

Till next time...
God's love and blessings!

Tuesday, September 2, 2014

Wafer Paper Mini Book Tutorial

Hello there! Welcome to my sweet little corner of the web again. Today I am going to share with you a fun tutorial for making mini books. These are great for cupcake toppers, and I thought they were rather appropriate with everyone in this house heading back to school this week.

I recently made this storybook cake for a baby shower:
Along with some matching cupcakes.

Since this was the second time I've made these books, and I had a lot of questions about how I made them the first time, I took pictures as I worked so I could write up a tutorial. Hope it makes sense. :o)

The first couple of steps I don't have pictures for, sorry. I went to the library and checked out books that I wanted to use. Then I scanned each side of them, including the spine, into my computer and used PhotoShop to put the pieces together. Then I laid them out in a document to fit as many as I could on a sheet of wafer paper at about the size I wanted them to be. I actually could have made them a bit smaller and they would have looked fine. The next step was to use my edible printer to print the book covers onto wafer paper.
Once they are dry to the touch, you need to cut them out. I used a paper cutter, but you could easily use scissors for this as well. Then I measured the size I wanted for the pages and cut them with the paper cutter as well. Now, my inside pages were blank. You could print these as well, but that was WAY more work than I was willing to do. I liked that I could stack a couple of sheets and cut them at the same time. This was also a good way to use some of my wafer paper that got kind of crushed in transit to my house. (You can see the torn corner on this one.)
The next step is to glue the pages together. I used a paint brush to apply piping gel just to the "spine" edge of the paper and then stacked another one on top. I think I did 6-8 pages/book. Depending on the spine, you could do more, but these were children's books, so they're not very thick.
Now, back to the covers. You need to roll out some fondant. I think I went to 3 or 4 on my KitchenAid pasta roller. (LOVE my pasta roller!) You could go thinner if you'd like. Once rolled out, I used piping gel all over the backside of the book covers and "glued" them to the fondant. Then I used an exact-o knife to cut around the edges.
It helps to fold the book in half for this next step just to help you see where the spine is. Fold it, and then lay it out, with the inside face up. Run a line of piping gel right along the spine.
And then "glue" your pages inside. The fun part about this is that the book can be somewhat opened to see the individual pages inside.
Because the covers are made with fondant, they edges tend to get a little ragged with handling.
Simply tap the edges on your table top, and that will push in any fondant that may have squished beyond the wafer paper edge and kind of even things out a bit. You'll want to do this on all three of the cut edges.
 Ta-da! Nice and smooth.
And there you have it. Lots of cute mini books to decorate with. These can be made several days ahead to make things easier on baking/decorating day.
If you don't have an edible printer, I've heard there are places where you can send your picture and they will print it for you. I just don't know who they are. You could also simply wrap the wafer paper pages with fondant, let it dry a bit and paint your book cover with food coloring or edible pens. A Bible would be pretty easy to do with this technique as you would really only have to draw a cross on it.

I hope this tutorial will be of help. These really are fun to make, and there's just something about miniature things that are just so fun to play with. :o)

Till next time...
God's love and blessings!

Thursday, June 19, 2014

Knights in Shining Armor--Icing Smiles Cake

Thank you for the sweet comments and thoughts on my last post. We do still miss Cindi, but I am enjoying getting to know her kids and grand kids through this awesome thing we call social networking. Just wish they would hurry up and invent some kind of teleporter so we could visit each other more often. :o)

I know I've been pretty terrible at posting here, and it's usually because life is pretty busy. Busy with home schooling, making cakes, taking care of the house, making cakes, yard work, more cakes. I think you get the idea. Anyway, we are done with our school year and I have 2 cake-free weeks, so I thought this would be a good time to try and catch up here a bit. 

This cake was done a couple of months ago for Icing Smiles. This is the second time I've been able to do a cake for them. You can see my first one here. This time I was asked to do a cake for the siblings of the sick child and it happened to be for two brothers. They wanted a "knight in shining armor" theme and I was pretty much given free reign to do what I wanted. I only wish I hadn't been so swamped with other cakes that week and would have been able to put more details in.  
My very first, ever castle cake was a disaster. It was in my early, early years as a decorator and I knew absolutely nothing about fondant. I decided to stack cupcakes and skewer them together for the turrets and just cover them with buttercream. Yeah, not such a great idea. I actually had two castles to make for that party...one for a girl and one for a boy. When we arrived, one of the boy's turrets was completely fallen down and ripped right down the middle. There was no saving it. I was nearly in tears when the dad ran back to his kid's room and brought out his toy knights and cannons. He quickly set them up by the cake and pronounced that castle as "under siege". He saved the day and probably my future as a decorator. :o)
This time I made the turrets of rice crispy treats and I am SOOO glad I did. I ended up driving down a horrible dirt road to deliver this and we had another downed turret. :o( Two downed knights as well, but since they were made from gumpaste with wire supports inside, they were fine. We just placed the turret back up and re-positioned the knights and we were good to go. :o) If I ever decide to do one of those amazing multi-tiered, turreted castles like this one, I may just have heart attack getting it delivered.
This story is about more than just cake though. These two brothers have two younger sisters, one of which has been very ill. She has been on dialysis for most of her life and desperately waiting for a new kidney. That prayer was answered yesterday as a complete stranger was willing to donate hers and they have finally been able to have the surgery. I've been so blessed to see how God has taken care of this little one and I pray she will continue to heal well and have no issues with the new kidney they've dubbed "Bruce". I also pray for the sweet lady who was willing to travel thousands of miles and undergo major surgery to give a piece of herself to this little girl. Amazing love there! Simply amazing. I am sure they would covet your prayers as well. You can read more about it and see updates  here.

Well, I'm finding that my two weeks of cake-freeness is quickly slipping away, so I am going to close this and go do some fun crafty stuff (my other hobby :o).

Till next time...
God's love and blessings!

Sunday, June 1, 2014

In Memory...

Hello there. I'll be honest. I'm having a really hard time with this post. I almost didn't post it at all. I almost went through my computer and deleted all the photos of this cake, hoping maybe if the photos were gone all the bad memories would be too. It doesn't work that way, though, does it?


March 21st I got up a bit early to snap some photos of this cake in the daylight since I was up late the night before finishing it and my hubby was taking it to Cindi, one of his co-workers, on his way to work. She had the day off because her family was coming to visit from out of state and had asked me to make this cake for her Son-in-Law to celebrate his birthday. They never had that celebration. I received a call that afternoon from my heart-broken husband. Cindi had gone to the store after Mike dropped off the cake. She was in an accident on her way home. She was pronounced dead at the scene.

I have to say there was a huge amount of sadness and crying here, but there was a lot of good things too. I guess there really was a celebration, just not the one Cindi had planned for. Instead, we celebrated her. We laughed, we cried, we reminisced, we cried some more. I can't possibly put in words what a wonderfully, amazing woman Cindi was. I had only known her for the past 5 years, but in that time, she had become very special to us as a family. I will always remember her smile, her laugh and her joy.

I finally decided that I needed to blog about this cake because I think there are things Cindi would like everyone to know. The first one, and I'm sure you've heard this many times before, is that you have no idea how much time you have left on this earth. Are you ready for eternity? I'm so glad to know that Cindi was. While I still cry for her at times, (for some reason it seems to always be while I'm washing dishes), I am so excited to know she is up in heaven with our Father, worshiping and praising Him.

What about you? What if it had been you in that car? Where would you be right now? I've blogged about this on my family blog. The Bible teaches that God created us and He loves us. He wants us to love and worship Him, but in order for it to be true love and worship, He had to give us free will. It's not love if isn't our free will. But that means we have choices-to love God, or to sin. Sin simply means not pleasing God and the Bible teaches that we ALL sin (Romans 3:23). While He's a loving God, He is also a just God and His judgement for sin is eternity in hell. Eternity is a long, LONG time. He knew we could never be good enough. We can never work our way into heaven. No matter how much you go to church, or do good things, there will always be sin. We need help, so He provided that help by sending down Jesus to be the perfect sacrifice for us. He was perfect. He never sinned, and He loved us so much He was willing to pay the price for our sin for us and die in our place. Salvation is a free gift, but, like any gift, you have to receive it. It isn't automatic. God wants you to:
Admit you are a sinner and Ask for forgiveness
Believe Jesus is God's Son, He died for you and rose again
Commit your life to Him. Allow Him to be not only Savior, but Lord of your life
and Don't delay...you have no idea how much time you have left.

The second message is for those who know Christ as their Savior. One of Cindi's daughter's made a comment to Mike and I. She said, "I want you two to know how special you were to Mom. You were Jesus to her." I was taken aback by the comment. Mike and I hadn't done anything special. She was our friend. We loved her like we loved our other friends, but we weren't aware of things that had happened to her in the past and what a hard time she had had. We just loved her, and we didn't realize what an impact that love had on her. Her daughter told us of comments she'd made during their phone calls and the change she'd seen in her mom over the last several years. A new joy she'd seen in her. It warms my heart to know that God used us to show love to her. We got to give "God Hugs" and didn't even realize we were doing it. I guess what I'm trying to say is that what you do (or don't do) makes a difference in other's lives. You may not know it (we didn't), but God can use you to help someone through a rough time and bring some joy into their lives. You can give "God Hugs" too. I, for one, plan on asking God to show me where He wants me to be helping and "hugging" others for Him.

Well, now that my keyboard is all wet, I should close this and find a tissue box. I do pray for you that if you're not sure of your salvation, find a good, Bible believing church (and unfortunately there are many out there that do not follow the Bible) and talk with a pastor. Or, better yet, find a Bible, open it up to Romans and read. Ask God to help you and He will.

Till next time...
God's love and blessings.